
Games Room Conversion
Background
After 12 years of my running home metalwork business “DD Metal Products Ltd”, various factors combined that made me take the decision to retire. The business was housed in a detached “Compton” concrete-slab double garage with a little wooden add-on shed, it was a tight fit and looked a bit like this…


It was very tight in there, but it was a very successful business for its 12 years of trading. This type of work takes a heavy toll on a such a small building, even the concrete floor was suffering – not really a plus-point for property values, the walls were thick with grime as well.
Following the decision to retire, the equipment was sold off, nearly all of it held its value over the years, proving the point that buying well known equipment is nearly always an investment. Some of the self-made machinery didn’t fetch too much but that was fine because the cost was far lower and it all earned its keep.
Well on the way to being clear, it looked like this…

The floor damage can be seen as well as the general filthy state of the walls etc. Now to decide what to do…
Decision made
After much discussion it was decided we wanted to tidy it up and install a pool table and darts board etc, turning it into a garden games room.
There are a few options for a garage conversion – ranging from a quick coat of paint to full lining and finishing. I wasn’t interested in a quick paint-over as i wanted a room that would be comfortable enough to use for our chosen task, and for future owners to use as an office or studio etc.
The conversion method I selected was to line the ceiling with 12mm plywood, it’s already insulated to make a “warm-roof” where the insulation sits on top of the rafters which are bolted to the steel trusses. The roof itself is architectural PVC coated steel on top of 50mm KingSpan/Celotex and was fitted about 8 years ago, this is a great system and I would not hesitate to fit the same again. Even in this years (2020) heatwave it did not get hot inside.
The build

It turned out to be a pretty tough job lining the ceiling, ply is about the same weight as plasterboard but easier to handle – it won’t snap if handled roughly, but the roof trusses were not square so each board needed a filler strip down each edge. Each ‘bay’ takes almost one full sheet of 1200mm x 2400mm board plus the two filler strips – the bays are about 2550mm wide.

Loads of filler was needed to fill the screw holes plus smooth the transition from the sloping to flat sections at the apex. It looked a lot better for just covering up the grime! The ply will be sealed with an acrylic primer as I want to finish-coat with emulsion paint which does not take too well to bare wood.

As you can see above, the up-and-over double door was removed, this was done about 4 years ago – the garage has extremely limited access to the driveway, the original owner just managed to get an MGB car in – these are very small cars, modern ones would not fit at all. I pulled the door off and fitted double wooden doors to one half and a 10×8 wooden extension shed to the other half to expand the workshop area.
The floor
With the ceiling done and ready to prime/paint, the floor was next. The concrete slab has never shown any signs of damp so I was pretty certain it was well laid and had a damp-proof membrane in it. I did not want to raise the floor as the head-room is tight, the roof trusses are only about 6′ 3″ from the floor. That ruled out heavy floor insulation with boards over, my end choice was a double foil-coated foam layer at 5mm thick topped with water resistant tongue and groove chipboard sheets. The total height loss was only 23mm which was ok.

23sq m of chipboard later and it looks like this. The insulation was taken up the walls a little and sealed off with foil tape.

A good tidy up and it was on to the walls. These need battening to support the 12mm ply wall lining. Behind the ply will be 30mm Celotex/Kingspan sheet – it was kept thin so as not to lose any floor space while still gaining some useful insulation value. The 2×3 battens are fixed to the slab bolts with steel angle brackets, two brackets per upright seemed sturdy enough.

The far left and right battens were fixed first, then a string-line was used at the top to keep all the middle battens true, the bottom of each batten was adjusted to get them vertical. The plywood sheets will overhang the battens, this overhang will be used to fix backer-strips which will in turn be used to secure the narrow vertical sheets of ply between. The spacings are in feet and ply only comes in one size, the best-fit option seems to be one nearly full sheet per bay with a narrow sheet over the concrete support columns secured to the backer-strips.
Walls & windows
I added some long ‘noggins’ to the wall battening, hopefully that will be good enough with 12mm ply on the face, the gaps will be filled with Kingspan/Celotex PIR sheet. The picture only shows two noggins but in the end i added a middle one as well.

The windows are being replaced when they arrive, similar battening is applied to this wall, allowing for boxing-in the window reveals. The new windows are UPVC and non-opening, an opening UPVC window this small has practically no glass but getting rid of the moving frame gives a more acceptable result.

Ceiling primer
Not much progress this weekend due to trouble getting delivery slots. I put a coat of the acrylic primer on the ceiling, this is needed as emulsion does not cover well on bare wood. It brightened things up a lot as well, top finish will be 2 coats of matt white emulsion. The roof trusses will be matt black.

Battening out
Things are moving along better now, several deliveries are booked this week. I managed to get nearly all of the battening done today…


The end wall has a severe bow in it, i think the garage was built on a Friday afternoon after a visit to the pub 🙂 I had to double up on the batten supports to get a straight run when finished.

The insulation sheets also arrived so I managed to get a fair bit of that cut and fitted – its only 30mm thick so easily cut with a long knife.

Should get the other wall done tomorrow plus start work on battening the last wall and framing out the doors that will hide the outside double-doors and the little workshop area.
Warming it up
I got the insulation finished on three walls today, the insulation is a time consuming job to fit, it needs to be cut just right as you can’t just ram a sheet in if its more than a millimetre or more too big. At least using a knife to cut it means there is no dust created – the thicker sheets need sawing. The last wall is awaiting a timber delivery which was delayed 🙁
All the joints are foil-taped and I’m waiting on the plywood lining to arrive now.

Half the plywood arrived just in time to see how the panelling was going to play out, I put a couple of sheets up and it looks like it will be pretty easy. The fill-in strips will be the hard part.

Wall lining
Got going on the wall lining today, I was glad to see my idea of backing strips to support the filler panels worked 100% and kept the faces all nice and level…


It gave a very good joint between the two main panels, a little filler and it will look great. I managed to get two walls completely finished, waiting for more plywood sheets again – I split the deliveries as carrying the sheets from the driveway to the garage does my knees no good at all.

It’s also starting to get warmer inside as well, outside temperature has been a pretty steady 11c, at the start i had two 1kw heaters on to raise it to around 15c and was working with a sweatshirt over a t-shirt, now I have just one heater and working in a t-shirt alone.
The end wall
Managed to get the end wall finished and the window wall almost done today. The new windows are on the way so these wooden ones will be gone soon, the frames are both rotten and were due for replacement anyway.

The last wall needs a bit of thought, it needs two door frames building in, one single on the left and a double on the right, plus there isn’t much of a support wall there so it will almost be a self-supporting stud wall.

Framing the last wall
Got started on the last wall today, pretty much a free-standing stud wall as there is not much behind to fix off of. It has a single door on the left and two doors on the right. The double doors will be fixed shut as it is doubtful they will ever get opened again until the pool table goes out in the future, it’s just not worth the hassle of hanging them fully.

The entry door wall was also mostly finished today, just needs the window and door reveals boxing out to complete it.
Got the last wall finished – insulated and lined today, apart from a door to fit and some small finishing trim round the door frames and windows it’s all done now. Looks totally different and with the double doors fitted (picture to follow) the temperature jumped up a couple of degrees as well.

Nearly ready to paint
The room looks much better with the doors in place, feels a lot warmer too. The last one is waiting for some hinges to arrive. All the screw-heads and gaps are now filled and the first half of the room is sanded and ready to prime.

Priming the walls
Things are moving rapidly now that the heavy woodwork is finished. Today saw the walls primed with acrylic primer and the ceiling finished with 2 coats of matt white. Due to the water evaporating off the wet surfaces, the humidity went off the scale, I had to have the door open to get some air in!


Had my friendly electrician pop by last night and pulled the old consumer unit out, fitted a new, smaller one and connected up a couple of temporary supplies for the lights and a floating socket.
Time to paint
Got the first coat of emulsion on the walls today, I’m using Crown paints “Crushed Chocolate” & “Dash of Nutmeg”, it looks a bit blotchy in the photos as it’s still drying. Two coats will do it, once thats dry I can fix the dado rail and door architrave mouldings, these will be glued on using Evostik “Sticks Like Sh*t” grab adhesive.


Top-coat time…
I second-coated the walls today, looks much more ‘solid’ now. Once that was dry I could get on and fit the architrave moulding around the doors, a fiddly job but makes so much difference.


Next up was the dado rail, a nice easy job to fit as all the walls are flat and even. The Evostik “Sticks like sh*t” adhesive really does work for this job. I used pins every couple of feet to support the rail while the glue grabbed and the pins could then be removed.

The sockets and switches were also fitted, tested and connected up. The next job is to fit the skirting boards followed by a coat of Dulux Satin White paint – I’m using pre-primed MDF mouldings for architrave, dado and skirting – this stuff is much flatter than normal pine mouldings with no twist or warp anywhere.
Roof detailing
Short day today, other tasks to do – managed to get a coat of matt black on the roof trusses – a minor part but makes so much difference, hard to tell in a picture though.

Also added an old iPad mini mk2 with a wall-mount as the media player, older iPads make good media players even though not much use for anything else due to their age. It can sync to the house over WiFi and a permanent charger means the elderly battery makes no difference.

Skirting the issue
Short update today, got the skirting boards fitted – that tidies up the bottom of the walls a lot. The rest of the day was spent putting the first topcoat on the architrave, dado rails and doors.

Finishing off
Almost finished !
Got all the painting done apart from the little area around the windows which are due to be pulled out this week. Carpet tiles are stacked to allow them to normalise for a couple of days, floor is vacuumed clean and marked out for laying them. Also managed to fit the pool table light bar, can’t easily be seen as it’s hidden behind the temporary work lights. The music is currently provided by an old mini-music stack which has been stashed away in the loft for the last 12 years, might get something that sounds a little better later on.


Glazed over
The new windows arrived bright and early so out with the saw and crowbar, two hours later saw both windows fitted and looking very nice. As with the the rest of the walls, the window apertures were off-square and the frames needed a little persuasion to go in but it wasn’t too bad. The insides need some UPVC trim-strips fitting to cover the gaps as the new frames are about 30mm thicker than the old wood ones which left a small gap, too big for mastic.

The outside of the frames have been sealed with frame sealant but there is some more work to do when the weather gets a bit better, it’s water-tight though.
After a tea-break I thought I would see how the carpet tiles would be to lay, a couple of hours later it was all laid! Turns out they are easier to lay than I thought 🙂 The adhesive spray used stinks though and I had to wear a full breathing mask rated for spray paint and fumes, I try not to take risks with solvents etc, especially working alone.


The paint colours chosen were a perfect match and it all ties together nicely, with the exception of removing the work lights and a good vacuum to get rid of the little carpet trimmings it 100% finished now. The pool table is due in the next 10-12 days, I have some stools to put together and a small table and thats it – playtime!
Total time from advertising the first machine for sale to completion was eight weeks – not too shabby for a lone worker with duff knees.
Delivery day
Around 3 weeks after ordering, the pool table arrived, I was pleasantly surprised to see that it lived up to the claims made by the dealers – it’s a refurbished heavy-duty pub/club table and was in excellent condition, very well made and looks great.
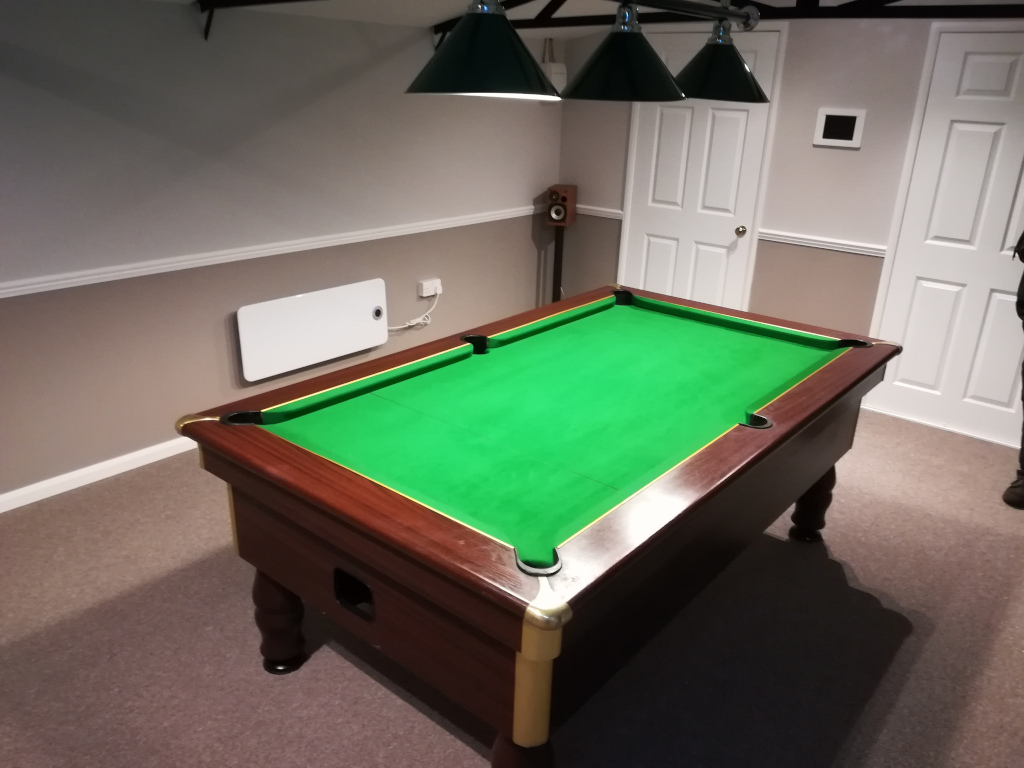
It came with an upgraded set of balls, three cues (2 x 57″ and 1 x 48″) a table cover, brush, chalks, spare cue tips and the triangle. Just in case anyone is interested I got it here – Sherlock Amusement Sales and would happily recommend them again.
Now for some fun 🙂
Update
A year later and the room has been a great success. We have had family gatherings, a birthday party and various other evenings and all featured a few games of pool. It’s a great game to have with a few friends, drinks and snacks etc.