
Home Cinema Build
In 2013 I converted a double bedroom into a home cinema, it’s now 2021 and the room is still in use and a great place to relax on a Saturday evening. Here is the story of the conversion, taken from my older blog site…
Prepping the room
It’s early days yet, only started on 15/02/2013 but already have the 2.9m x 3.8m former bedroom cleared, stripped, filled, sanded and prepped for work.
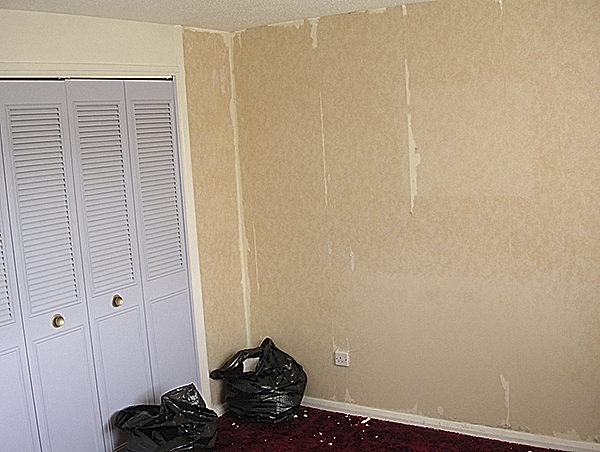


Tonight I levelled and mounted the support battens for the screen, this will be a 2.1m wide 16:9 format fixed screen from MDF sheet. This was then primed on the back and mounted, the front will be coated with grey primer then two coats of “Pourascreen” paint, a grey finish with a gain of 0.85.

Wallpaper will be a black leather effect from B&Q, ceiling is going dark matt grey and I’m fitting a halo with led lighting and led downlighting around the perimeter.
I was hoping for lots of curtains but having just got the first quote back, I might need to redraw my design, the shop wanted upwards of £3500 to make three pairs of black velvet curtains! That’s almost double the budget for the whole room.
I’m going to price up a cut-down version of my design and see what that does to the price.
Lighting halo and walls
Having the halo makes curtain hanging a doddle too, I made sure it was strong enough to hang them on it. I am hoping to hide the wires for the led lights in it too, maybe even the projector power and HDMI cable.
The MDF used for the halo is a bugger to paint if not sealed first. Luckily though it’s only a small area so I can bung on two or three coats, should do it.
The MDF screen has its own primer – two coats of Rustins grey all purpose followed by two coats of Pourascreen paint as recommended by the makers.

Got the ceiling finished today along with the black on the screen wall, I can honestly say that B&Q “colours” range of matt black and grey emulsion is the mattest flat black emulsion I have ever seen, totally flat
Fitted the blue LEDs as well and prepped for skirting paint and more wiring tomorrow.
Not too keen on the dimmable gu10 LEDs though, they tend to strobe and make moving things like your hands appear to jump, nowhere near as good as halogen but as they’re for general lighting it’s not important, the white perimeter LEDs under the halo should be better as they run off DC.
Got the decorating finished today, wallpapering is not my favourite thing but I was impressed with end appearance, worth the hassle
Started running speaker wires in, got the electric curtain track up for the screen, probably put the undercoat on the screen tomorrow night.

Lighting
The curtain woman came to measure up last night, loved the room 🙂
Going to be up to four weeks to get curtains made and fitted though.
Not ready yet though, got to find a suitable way of concealing the electrickery for the LED’s, get a stand for the amp, shampoo the carpet, mount the projector, run some more cabling and paint the screen.
Put two coats of undercoat on the screen this morning, give it a rub down tonight ready for top coats tomorrow morning.

Tested the LED controllers, will work fine I reckon, I’m using a PSU from an old computer, it had a 12A 12v output so will be plenty man enough for the job and it’s fan cooled too.

Got the projector mounted – note to self, next time remember that the lens is off-set from the body so don’t mount the bracket centrally! I managed to get it on the adjustable mount but might have to remount the bracket if it’s not enough.
Screen painting & lighting tests
I put the top coats on the screen today, the “pourascreen” stuff goes on very well, I used a short-pile 4″ roller and was a bit concerned when I noticed it was leaving a stippled finish but after a few hours it had smoothed very nicely and was a uniform finish from corner to corner. You can see the reflective flecks in it and the colour is a pale grey.
I still can’t fire up the projector as there is still some wiring to do but it won’t be long now.
Gave the LED’s a good testing…

The two pics of the LEDs are grossly exaggerated, the little camera does not like dark shots, the levels are very comfortable in reality. The little remote is programmable so I can flick from entrance to viewing levels at a single button press, plus any level in between.
Sitting there playing with the remote for lighting I got my first glimpse of just how comfortable this room is getting, also got some nice framed movie posters up on the back wall.
Projector testing
100% success 🙂
Fired up the projector tonight, discovered that I needed to bring it closer to the ceiling by about 100mm because I really didn’t want to use any keystone correction. Gave the mounting bracket some severe modifications and an hour later we were back in action.
Brought up the test grid to get it all central and square and with maximum lens shift it fitted the screen perfectly, no keystone and perfect dimensional match to my screen size.
Of course, it was then only a matter of grabbing an old DVD player and stuffing the HDMI lead in…

I can honestly say that straight out of the box, the picture is absolutely amazing.
A quick adjustment of ambient lighting and flicking it onto smart-Eco lamp power and that kicked it up another notch, nicely saturated colours and excellent shadow and highlights.

I can only think that after a bit of fine-tuning it will be even better, I’m very happy so far. It’s very hard to get a good photo but the image is amazingly clear and sharp, and very big 🙂

Getting up real close with the camera shows very fine details, no visible pixels and a good image.
Halo details
While I was building the cinema, I was asked for more detail on the halo, here is a little more…
Take a length of 20×100 timber and screw to the wall all around the room, nice and level and about 4 – 5″ down from the ceiling. Then get B&Q etc to cut most of a sheet of 12mm MDF into 120mm wide strips and screw these to the underside of the first lengths of timber forming the shelf of the halo.
Next I painted it all to match the ceiling, in my case soft black matt from B&Q, then I installed the LED strips, I used 60 led per metre ones on 5mtr reels at £7.50 per reel on eBay. I used three reels of blue facing upwards and three reels of warm white facing downwards. The blue ones are stuck to the bottom edge of the upright timbers and the white LEDs are stuck to the underside front edge of the halo shelf.
To finish off I fixed strips of 4mm x 44mm pine (B&Q again) along the front edge so that I had 10mm above the shelf all round. The shelf is a great place to hide speaker wires and the leads to the projector. This thin vertical strip hides all the LED’s and gives a very tidy finish.
I am running the LED’s off of a three-channel RGB controller and amplifier, eBay again. I’m using one channel for the blue’s, one for the screen wall white down lighters and the third channel for the white down lighters on the the other three walls.
Adding some bling
I added some bling to the otherwise dull rear wall…

These are the chairs, I got them from Amazon, very comfortable and they recline, they come with matching foot rests.

06/12/2021 – Update on the chairs – they lasted fairly well but the fake leather-effect vinyl is now worn out and falling off, I guess the time span is not too bad but they do only get used once per week so they would not last at all in a regular situation. We are currently looking for some new ones.
It’s curtains
The curtains finally arrived today.
Wow, black velvet really seals the deal! The whole room fell into line with what I was after at the beginning – a very luxurious, comfy, relaxing place to watch films in.
The front wall, seems pretty black, no reflections:-

Front-right corner:-

Screen curtains shut:-

Front-left corner:-

Curtains covering the cupboard doors at rear-left:-
The black stage velvet hangs nice and straight, the curtain fitter was impressed with the quality of it. With the “blackout” window curtains drawn, the room is 100% dark, you can easily use mood lighting while watching the movie, blue LEDs on at very low power looks stunning and doesn’t interfere with the picture at all.
The velvet has also quietened the acoustics a good bit, there are no echoes at all now. I have run Audyssey setup again now that everything’s in it’s proper place.
I think the project is a total success, the wife loves it too, today was the first time she had seen it since my starting the job.
Audio setup
The sound system is an Onkyo TX-SR608 AV receiver coupled to a relatively budget speaker system – this can be upgraded as needed later on. The setup uses the standard 5.1 speaker system but I also added two front-high satellites which really gives the front a much bigger sound image.
The rear speakers are low down behind the chairs as the room is pretty tight, getting the m further back from the seating position was not practical.
Getting the sub-bass right
I have been tweaking the audio a bit, since discovering the world of sub-bass hidden in the “War of the Worlds”, I wanted a bit more, the Rel “Q50” sub I had was giving its all but I wanted a bit more.
Luckily my brother had a spare Rel “Storm” available after an upgrade so I fitted that tonight. The Storm is a ported down-firing 120w unit and the Q50 is a sealed rear-firing 50w unit. Put the pair together and WOW! The room is really shaking now, you can feel the bass in your stomach, just right.
Maximum effect was had by putting the Storm behind the chairs with the amplifier and media player on top, the smaller Q50 goes at the front below the screen. Being on the 1st floor of the house means the subs can easily get the floor to vibrate which really enhances the effect, I like a solid, heavy bass feel to movies and this room is really giving it now.
After-use thoughts and changes
Nearly 8 years since I did this project, wow time flies fast!
The cinema is still going strong, the BenQ projector is still providing the great picture it always did, the screen is still mint, the sound system is all the same too. I have since upgraded the LED controller to a ZigBee unit and added a Harmony hub so I now have full control via our Home Assistant smart-home setup, the whole house has undergone a general ‘smartening’ with smart lighting and automation.

The Mac-mini I was using as a media player died a couple of years back and was replaced with an NVIDIA Shield (above) These tiny units are amazing, affordable and offer excellent picture quality with audio to match. Network connected, smart-home enabled, low power use.
The only thing suffering in the cinema are the chairs, the fake leather has failed and is peeling off all over now, makes a mess and they need to go soon i think. During the Covid lockdowns the room has seen even more use as well, it’s a great place to escape from the maddening world.